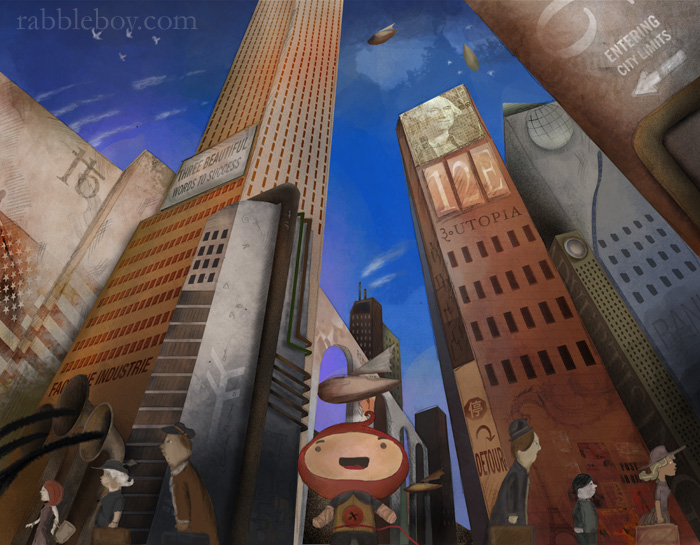

The Creation of a Metropolis: An image from the upcoming picture book “The Last One” by James Mowgli Song, illustrated by Rabbleboy.
Thanks for checking out my blog. I wanted to write something semi-informative while I’m in the process of creating “The Last One”… I believe will be something amazing.
I’ve been working on this for quite a while now but I’ve finally gotten steam in the last few days. Work and school has been taking up most of my time and this past week was my “off” week, so I simply immersed myself on this book. I hope to finish it soon because unless it’s finished… it won’t go anywhere! 🙂
My process is very chaotic but it usually starts with an idea and then a rough sketch. Since I’m not a traditional painter and have no background in it, I use my main tool of convenience… pencil, paper and mouse!
My main challenge was to create an image that feels and looks semi/organic. Most illustrations these days look very digital and I think people respond more when they can see it’s not all “computer”. So I hope I’ve achieved that task for this book…
—–
In this scene, our character enters a grand city for the very first time. I wanted to show how big and vast this metropolis would be to such a tiny doll. Using various contemporary and fictional references I drew a rudimentary sketch of the city. The wide perspective gave it a larger than life feel. Some of the ideas I had (as seen below) was to incorporate a bridge, some flying air ships, and large commercial and industrial sky scrapers and buildings. A big influence on this drawing is obviously New York City.
At this stage, I already knew where I would place my character illustrations, but instead of drawing them here, I decided to make a separate illustration and combine them later on this device I heard of called a compu-teerrr.

The next step was to trace all the main elements and structures. For my computer illustrations & coloring I use a Wacom tablet. I haven’t used the tablet in a while so my fingers actually hurt this time around.
I added base colors for each elements and a darker base for the shadowed area. After this, I pretty much threw away my reference Images and started to draw from imagination.
I added more shades and textures to the structures using different colors and brushes. A lot of experimentation, trial and error goes into this whole process. One of the challenges was to look at a bland empty image and figure out which part I want to work on first. I kind of moved around a bit instead of working on one particular “building”.
I also scanned and used various textures from rocks, paper, wood, brick walls etc and incorporate those into the structures to give them a more depth. Photoshop brushes are also very useful for this but can be easily overused. I believe I have 100 brushes on my photoshop but I always go back to the same 10 brushes over and over. These brushes are free if you search for them on the Inter-webs.

Below you can see some of the new textures added to the elements. I also played around with using fonts, distressing them and fading them back to create additional textures.
The bottom right has various images I scanned that are distressed beyond recognition to create more texture — right next to the “Post No Bill” sign.
For my industrial feel, I added these metal pipes that went down the side of the building as well as pipes that spewed out chemical waste. Using brushes and color mixing, I added a rusty texture effect to the pipes.
The bridge was also beefed up with additional textures and shadows.
At this stage, I was adding windows to the buildings. I had to recreate the windows several times to get them just right. Choosing this type of perspective is a little challenging because it’s hard to tell which way things go, they might look okay for a minute then all of a sudden they look weird because another element might trick you visually.

A lot of work goes into the textures and colors of each element. Color is very tricky and it takes a lot of patience or a really good artist to nail it perfectly and let them work in a harmonious way.
I also drew the air ships below (my little homage to final fantasy).

Not shown here is when I added more colors to the clouds using various brushes. Drew digital birds, smokes in the pipes and burning the edges and shadowy areas of the buildings.
In this step, I still felt that the illustration above was TOO digital even with all the textures. All the edges were too perfectly cut and vector looking. \
To remedy this I printed out the image and re-traced it on a tracing pad in front of my monitor (since I don’t have a light table… hey it works!). Once I retraced it, I drew shadows, doodles and various imperfections which I later scanned and overlaid on top of the final image. A neat trick is to also apply the “Median” filter in photoshop which softens the images as well.
Once I did that I went ahead and moved on to the next step… which was to add my main characters to the city. I simply sketched them individually, scanned, and colored each one of them.

See Below in full color. Look how happy they are!

Once my characters were done, I adjusted them a little bit by adding shadows and highlights.
I don’t necessarily work on these characters separately (from the main image) like shown above. I actually have them over the main image.
Once they were there, I looked back at the image and performed some fine tuning by tweaking more of the shadows and textures and adding more minor elements to various places that felt empty.

I hope you enjoyed this brief look at how this image was created. I know it’s not exactly a tutorial but hopefully you learned something along the way. Please share this and help support the project!
Now that school is back I have to read 250 pages in 5 days and write book report. Yikes!
To my writer friends, I hope I did not kill you with my typos, incorrect grammar & tense changes. Ha!
Geek Stats: The original photoshop image for this drawing is about 1Gigabyte.
I love it! Thanks for sharing.
Wow! I can’t believe a human could make such an amazing piece of art. Good job!!
Very nice! I love how you show step-by-step how you created this!
A spectacular piece of art if I do say so myself 😉
I think it’s amazing how you did this! No it.s not a tutorial but it does give us an idea of how something like this is created! You are quite talented!
This is so detailed. I simply cannot wait until the book releases! Very nice work! You are too talented.